Child’s Kitchen
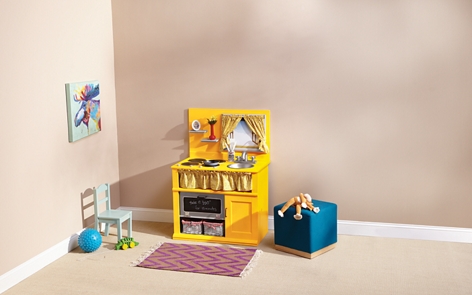
Turn a piece of used furniture into a bright and cheery kitchen play center.
- 1
- 2
- 3
- 4
- 5
16 hours plus drying time
- Krylon®
ColorMaster™ Paint + Primer
- Gloss Sun Yellow #51806 (4 cans)
- Gloss Pewter Gray #51606 (2 cans)
- Satin Black #51613 (1 can)
- Krylon® ColorMaster™ Plastic Primer - White #51321 (4 cans)
- Krylon® Chalkboard Paint - Black #807
- Krylon® Stainless Steel Finish #2400 (1 can)
- Leafing Pen - Silver #9902 (1 pen)
- TV stand or similar piece of furniture with door and shelves
- Craft wood: pine, sized for raised back, oven door front and faucet base
- Frame: Wood, sized for faux window
- Stainless steel bowl: sized for sink
- Drawer knobs for stove (4)
- Drawer pulls for doors (2)
- Faucet knobs (2)
- Wooden plaque: 6”x6” square
- Plywood circles: 6 ½”, thin (4)
- Baskets: rectangular with liners (2)
- Curtain rods: one pressure rod for long shelf, one sash rod for faux window
- Fabric: one yard, coordinating colors
- Hinges for oven door
- Magnetic closure for oven door
- J-bend PVC: 1 ¼” for faucet (found in plumbing department)
- Wood screws (10-20, depending on need)
- Metal brackets to hold backboard onto cabinet
- Sandpaper: medium and fine grit
- Accessories: dishes, tea-towels, flower vase, picture frame, utensils, etc.
- Chalk sticks
Tools
- Wood saws: circular saw and jigsaw
- Power drill with medium-sized bit
- Screw driver
- Sewing machine and thread
- Masking tape and paper
- Hot glue gun and glue sticks
- Pencil
- Measuring tape
- Prepare furniture piece by cleaning well.
- Determine where sink will be positioned. Turn “sink” upside down and place in position on top surface; trace around lip of bowl with pencil; remove bowl. Draw a line ¼” - ½” (determined by lip of bowl) inside the traced circle; this will mark your cutting line. With electric drill, make a hole in the center of the circle. Insert jig saw blade into drilled hole and cut circle for sink to sit inside.
- If shelves are adjustable, secure in place with screws.
- To make an “oven door”, measure opening of shelf area and cut wood rectangle to fit opening.
- Determine size for backboard of kitchen unit, by measuring width of cabinet, and calculating the height needed to accommodate the window and shelves. Cut wood rectangle to size.
- Cut wooden plaque in half to make two sections to be used as shelves.
- Determine size needed for faucet base, by positioning and measuring knobs and J-Bend PVC piece; cut wood piece to size.
- Sand surfaces of all wood pieces with medium-grit sand-paper, then again with fine-grit sand-paper.
- Remove glass, mat, and backing from frame, if necessary.
- Paint all surfaces of wood pieces with Krylon® Primer; repeat coats if needed for complete coverage.
- Remove basket liners.
- Paint inside surfaces of cabinet, shelves, baskets and frame with Krylon® ColorMaster™ in Pewter Gray; allow to dry completely.
- With masking paper and tape, mask off inside of cabinet to protect from over-spray.
- Paint outside of cabinet, and backboard with Krylon® ColorMaster™ in Gloss Sun Yellow; repeat coats to achieve desired coverage.
- Paint the 6” circles (burners) with Krylon® ColorMaster™ in Satin Black; allow to dry completely. Edge circles with Krylon® Leafing Pen in Silver.
- Paint front of “oven door” with Krylon® Chalkboard Paint in Black; allow to dry completely.
- To cover chalk paint on front of oven door, cut a rectangle with rounded corners out of masking paper to fit. Position mask onto oven door front and spray exposed areas with Krylon® Stainless Steel Finish. Once dry, spray backside of oven door with the same paint; allow to dry completely. With a Silver Leafing pen, outline chalkboard area.
- Mount handles on oven and cupboard doors.
- Using screws and a screw driver, attach oven door to shelf with hinges. Mount magnetic door hinge to inside top of door and shelf.
- With Krylon® Stainless Steel Finish, paint faucet, knobs, faucet base, and sink, according to manufacturer's instructions.
- Using fabric, sewing machine and thread, sew simple gathered curtains and tie-backs to fit window frame and shelf.
- Mount curtain on shelf with pressure rod.
- Apply sash rod hardware to window frame; hang curtain and tie-backs.
- Using metal brackets and screws mount backboard to cabinet.
- Using screws mount shelves onto backboard.
- Find desired position, and mount window so it will hang on screws, allowing it to be removed for changing the drawing or scene.
- Use hot glue to adhere, burners, knobs, sink faucet assembly, and to secure sink in place.
- Accessorize with play dishes, utensils, decorations, etc.
Child’s Kitchen was designed by Roxi Phillips.
Inspire your home décor by viewing more Home Décor spray paint projects from Krylon.